Personalized Storybook for Your Child — Step-by-Step with AI
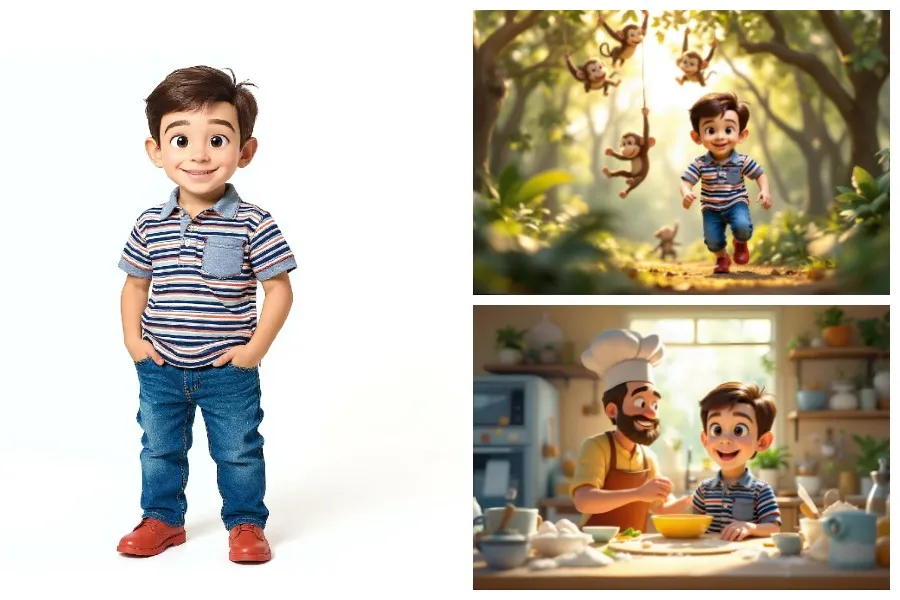
Illustrated storybook pages with a cartoon child hero in multiple scenes
I once made a little four-page book for my niece after she came home from a pottery class. I just used the photos from that afternoon as the plot. She could see herself on every page, and honestly that mattered more than any clever story I could have written.
This guide is the same idea with a bit more polish. A personalized children's storybook, made with AI: ChatGPT for the script, TheFluxTrain for illustrated pages starring your child, and Canva for a printable PDF.
Quick answer: You can create a custom illustrated storybook where your child is the hero in about an afternoon. Write a scene-by-scene script in ChatGPT, cartoonize them and train a character model in TheFluxTrain, generate each illustrated page, face-check consistency, then assemble everything into a printable PDF in Canva.
Note- Cartoonization, LoRA training, and scene generation on TheFluxTrain need a paid account and credits. Only upload child photos you have consent to use, meaning your own kid or a subject whose guardian said yes. ChatGPT and Canva have their own pricing. This tutorial sticks to the creative steps, not subscription comparisons.
Every spread uses the same trained character model, so your child stays recognizable from the cover to the last page.
What do you need before you start?
You don't have to be a designer, and you won't write a line of code. What you need is three accounts and one good reference photo. Set aside an afternoon for a first six-page book.
Tools:
- ChatGPT for drafting the story, tuning the tone to your child's age, and turning it into a scene-by-scene script with illustration prompts.
- TheFluxTrain to cartoonize your child (or pet), train a LoRA character model, generate the base scenes, and swap in your custom character. The character and scene steps use paid credits.
- Canva for dropping the finished illustrations and captions into a page layout, then exporting a PDF for reading or print.
Inputs:
- Reference photo: full-body or a clear portrait, simple background, even lighting, face visible. Skip sunglasses, heavy filters, and group shots where the subject is tiny.
- Story seed: a real outing works best, a pottery class or a birthday, or just whatever your kid is obsessed with this month. One strong theme beats a crowded plot.
- Consent: parent or legal guardian approval for any child's likeness you feed into AI.
- Time: three to five hours on a first book. Faster once the character model exists.
How do you write a personalized children's story with AI?
Start with something that actually happened. My niece's pottery afternoon basically handed me the scenes. Sitting at the wheel, the wobbly bowl she made, painting it the next day. A plot your kid recognizes will beat a fantasy epic they don't.
Open ChatGPT and describe the hero, their age, the tone, and any lesson you want in there. Keep the first draft simple.
Example
create a script for a story about a boy. he is the hero, and fights a villain to do good. involve simple character. Its a story for 5 years old
ChatGPT hands you a full narrative in seconds. The real work is the editing after that. Ask for shorter sentences, more jokes, a clearer villain, a gentler ending, whatever makes it read well out loud.
Once the story text is locked, ask for a scene-by-scene breakdown. One paragraph per illustrated page, each with a concrete visual description. You'll paste those descriptions into TheFluxTrain when you generate the backgrounds.
Example follow-up
Break this into six illustrated scenes. For each scene give me (1) caption text for the page and (2) an image prompt describing characters, setting, and art style—soft watercolor storybook, warm colors, no photorealistic faces.
Don't chase perfection on this pass. Lock the page count and the pacing first. TheFluxTrain is also adding ready-made story templates you can customize, for the times when the plot matters less than just getting your kid onto every page.
Watch a plain-language prompt turn into a full script you can split into illustrated scenes.
How do you turn your child's photo into a storybook character?
With the script locked, move on to the character. This is the part that turns generic, stock-looking art into your actual kid on the page.
Note- Cartoonization, LoRA training, and scene generation all burn credits, so plan for a few passes. Other tools can cartoonize a face too, but this workflow is built for consistent pages and for swapping the same character across scenes.
There are three parts here. Cartoonize and pose, train a LoRA model, then generate a few reference stills you reuse when swapping into scenes.
Cartoonize the reference photo
Start from the clearest photo you have permission to use. Full-body on a plain background is ideal. A sharp portrait works too, as long as the face isn't obstructed.
Follow the tutorial below to produce a cartoon version on white, with outfits and accessories you pick, plus simple pose variations you'll feed into training.
Pick one art style and stick with it for every training image, whether that's soft gouache, flat color, or a simple ink line. Mixing styles confuses the model, and it shows up later as drift on the pages.
Train a LoRA model for consistent appearances
A LoRA teaches the image model what your cartoon hero looks like from different angles and expressions. Once it's trained, you can drop that character into new backgrounds without redrawing from scratch.
Training tips:
- Use 8–15 varied poses from the cartoonize step, not the same photo duplicated.
- Keep the outfit consistent across training images, unless the story actually calls for a costume change per scene.
- Use the same character name in every prompt (
storybook hero, your child's codename, whatever you like).
When training finishes, generate a couple of standalone character stills on plain backgrounds. It's a quick sanity check before you commit to full scenes.
How do you generate illustrated scenes for each page?
Now you have scene prompts from ChatGPT and a trained character model. Each page gets built in two passes. The base scene first, then the character swap.
Base scene generation
Build the backgrounds and supporting cast first, using placeholder characters for now. At this stage you only care about composition and mood, not the final faces.
Open Story Studio on TheFluxTrain, paste the scene-one prompt from your script, and generate. Expect to tweak the wording a few times before the layout and palette match what you pictured. Three or four tries per scene is normal.
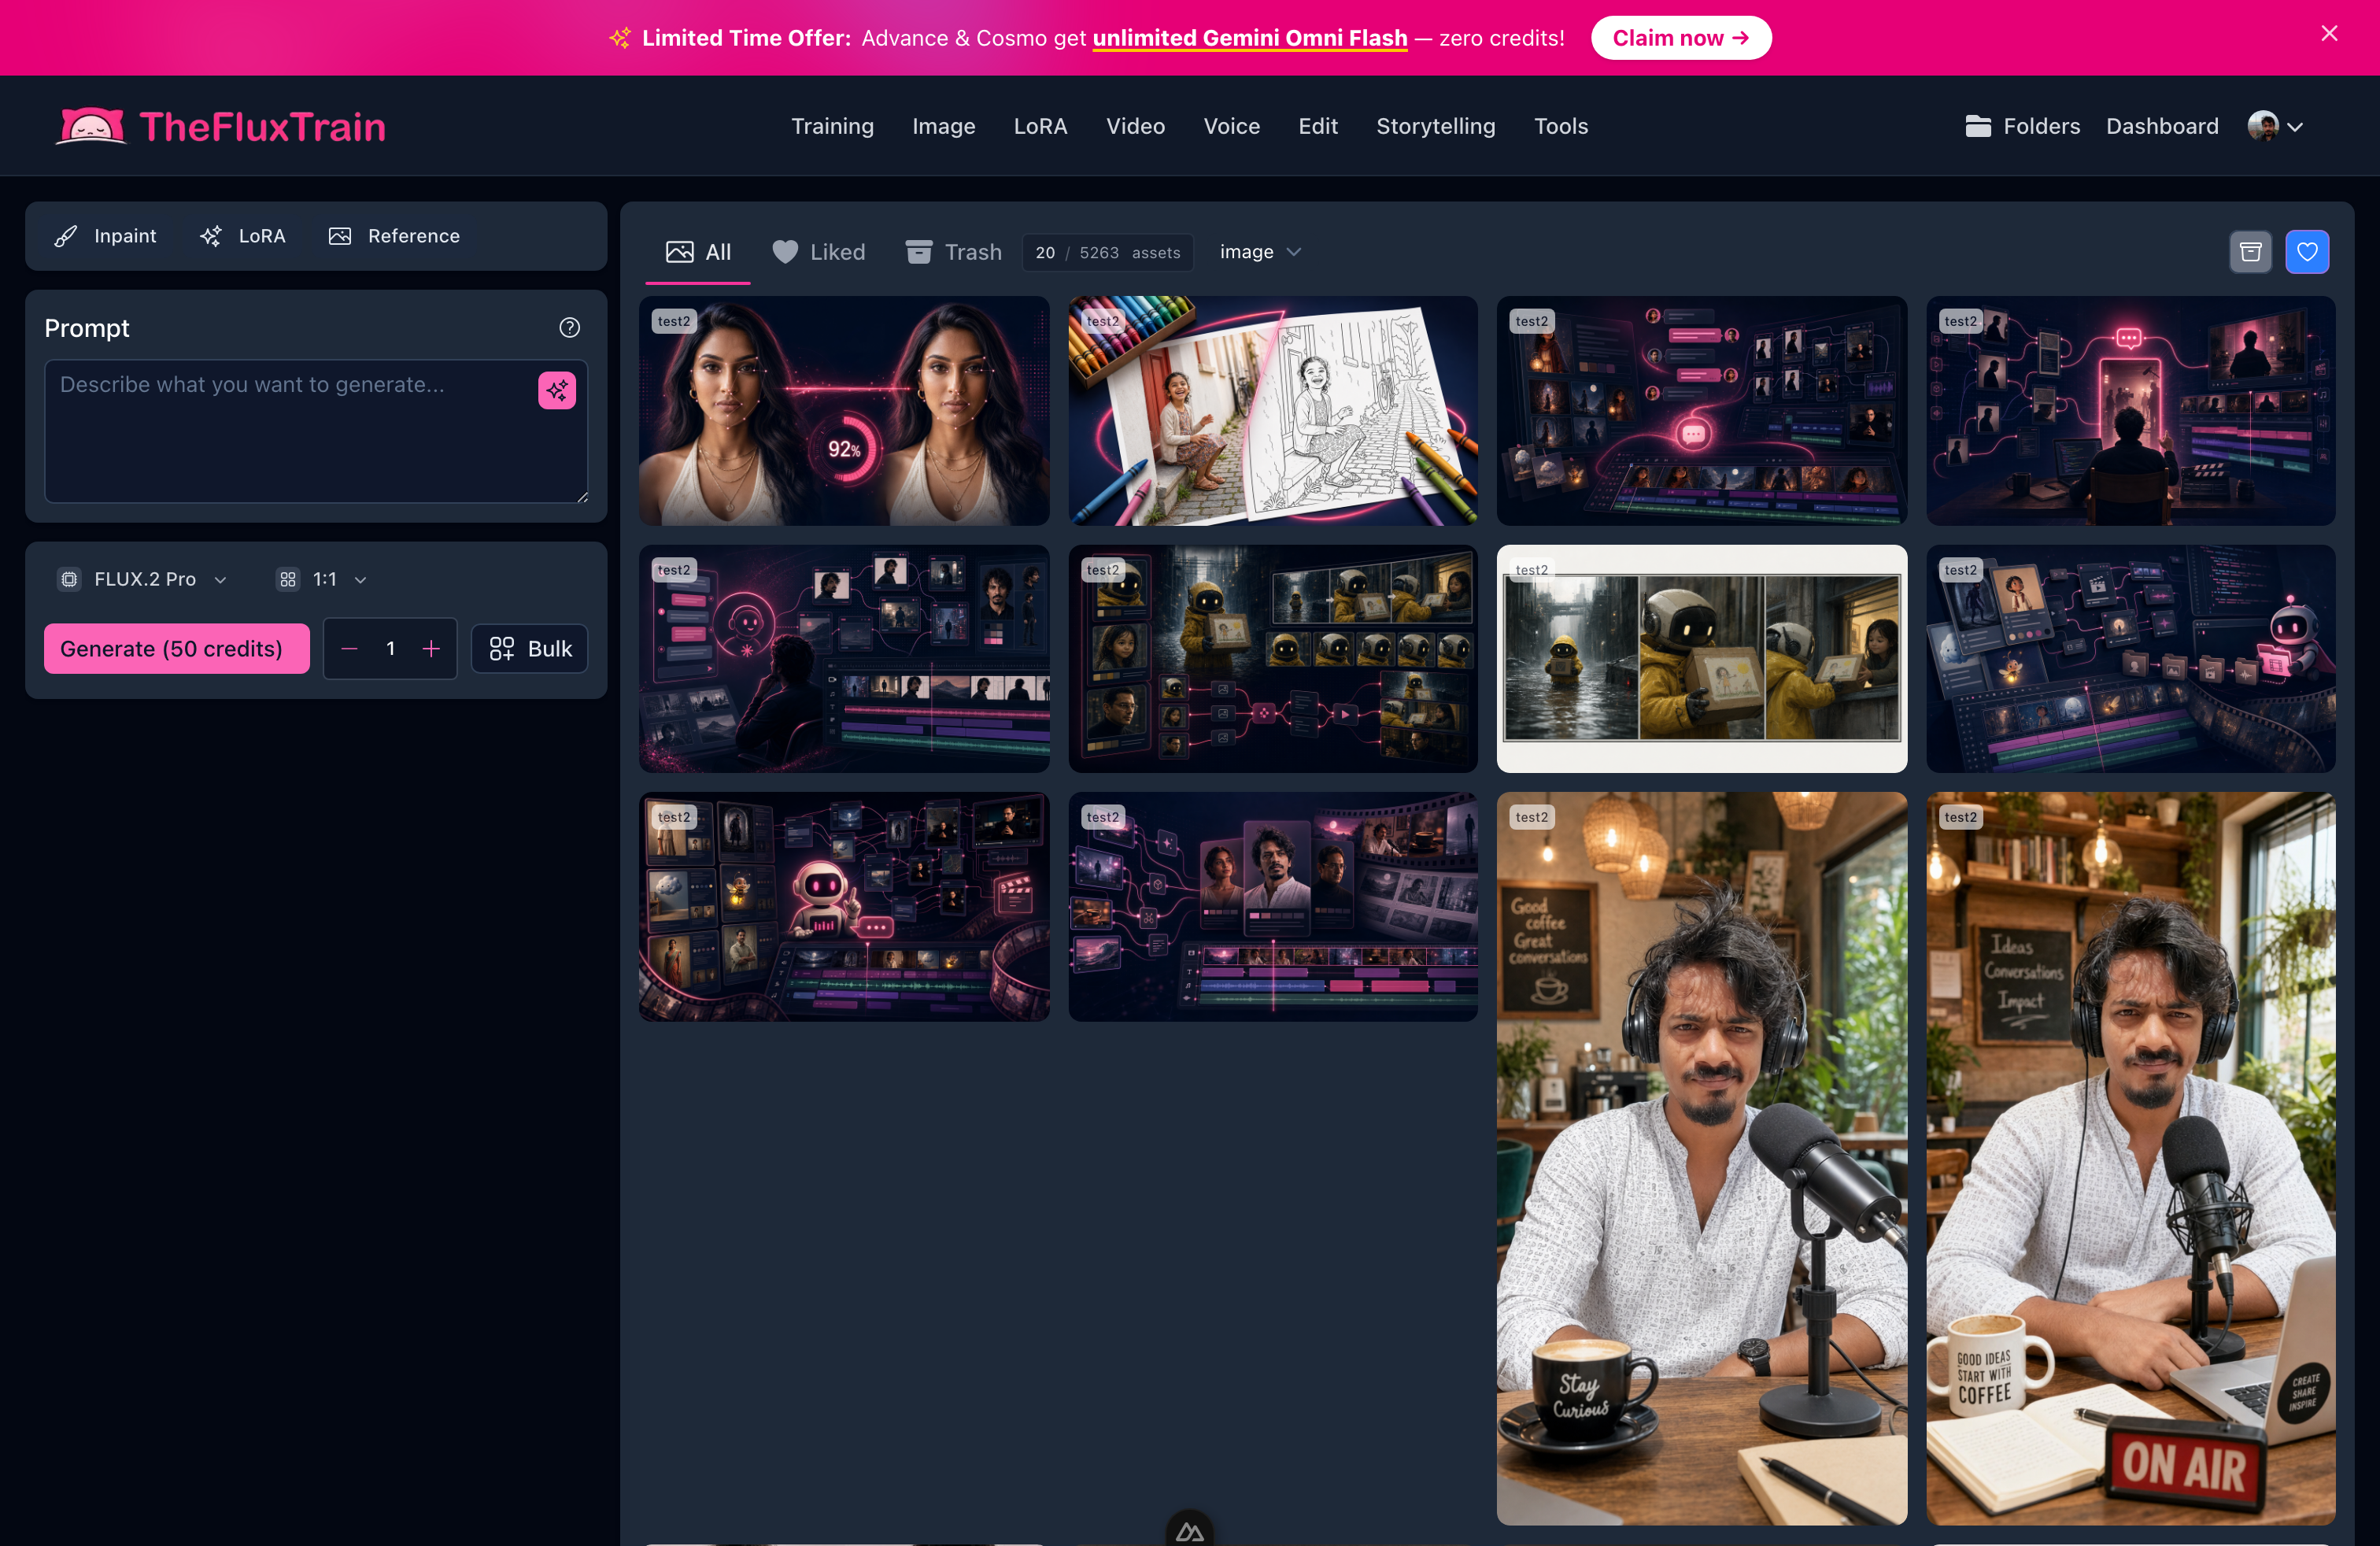
Story Studio: paste a scene prompt on the left, pick your model and aspect ratio, and generate. The grid on the right is where your base scenes and character stills pile up.
Lock the aspect ratio, square or portrait, across every page before you generate scene two. Changing ratios halfway through makes the Canva layout painful later.
Character swapping with LoRA and inpainting
Replace the placeholder figures with your trained hero using LoRA-guided inpainting. Instead of a one-shot app redrawing the whole frame and hoping it lands, you edit inside a scene you already composed.
For the tricky poses, like visible hands, a profile shot, or overlapping props, use the deeper inpainting walkthrough:
Repeat base scene, then swap, then export, for each beat of the script. At the end of this step you should have a folder of page-ready PNGs plus the caption text from ChatGPT.
Bonus without extra LoRAs: a talking dog, a sibling, or a magical guide can go in by inpainting supporting characters per scene, so you skip training a model for each one. That works fine for characters who only show up once or twice.
How do you keep the same character on every page?
AI illustration drifts. One page quietly changes your hero's hair length, the next ages them by a couple of years. You want to catch that while you can still regenerate, well before anything reaches Canva or the printer.
Run a face check on each exported still against your original reference photo. The free AI Face Score tool scores likeness, so you can reject the outliers and only regenerate the weak pages.
Quick QA loop:
- Keep the reference photo from the cartoonize step.
- Export each finished scene still.
- Upload the page and the reference to AI Face Score.
- Decide on a minimum score you'll accept for cartoon art. Illustrated styles score lower than photos, so expect some iteration.
- Regenerate the low scorers. Don't let one slide into the book "just this once."
A full walkthrough with thresholds, and when to retrain the LoRA versus redo the inpaint, is coming in a dedicated storybook face-check guide.
How do you assemble the storybook into a printable PDF?
Once the illustrations are done and face-checked, Canva is where the book comes together.
- Create a book layout. Use a square or portrait template that matches your illustration ratio. Duplicate a page for a dedication if you want one.
- Import scenes in order. One illustration per spread, or a half-spread if the caption runs long.
- Set child-friendly type. A large sans or a rounded serif, high contrast, short lines for early readers.
- Paste captions. Pull them from your ChatGPT scene script, and read each one aloud once to catch anything awkward.
- Export the PDF. A digital PDF for tablet reading, or a print-ready PDF with bleed if you're using a service.
Print paths:
- At home: heavy matte paper. Test print one page first for color and margins.
- Print service: Blurb, Printo, or a local shop. Upload the same Canva PDF.
Paper sizes, margins, staple versus spiral binding, and read-aloud pacing get their own guide soon. For now, export the PDF and print a test page before you commit to the whole book.
What bonus pages can you make from the same photos?
The same likeness works for coloring pages using the Children's Sketchbook Generator, a birthday edition, or a whole series that keeps the same LoRA for the next holiday book.
How do you try this on TheFluxTrain?
Sign in and follow the Story Studio tutorials above. For a quick coloring spin-off, use the Children's Sketchbook Generator. To face-check pages before print, use AI Face Score. Book two is mostly a new ChatGPT script and fresh scenes, since your character model already knows your hero.
Frequently asked questions
How do I make a personalized storybook for my child with AI?
Write a scene-by-scene script in ChatGPT, cartoonize your child and train a character model in TheFluxTrain, generate an illustrated page with that character for each scene, then lay out the text and images in Canva and export a PDF. A first six-page book usually takes an afternoon, iteration included.
What age is this workflow best for?
Most parents aim at ages three to eight. That is old enough to recognize themselves in cartoon art and young enough to enjoy a simple plot read out loud. You can ask ChatGPT for bigger vocabulary for older kids, but the illustration style here assumes picture-book proportions.
Do I need design or coding skills?
No. ChatGPT drafts the story, TheFluxTrain handles the character and the scenes, and Canva does the layout. What you do need is a little patience, because a face or a pose will drift and you'll regenerate a page or two.
Can I print the storybook at home?
Yes. Export your Canva layout as a PDF and print on heavy paper at home, or send the same PDF to a service like Blurb or Printo for a bound copy. A dedicated print-at-home guide covering paper size, margins, and binding is on the way.
Is it safe to upload my child's photo?
Only upload photos you have consent to use, meaning your own child or a subject whose guardian approved AI illustration. Use a clear reference photo with a simple background, and don't upload images of other children without permission. Review your TheFluxTrain account and privacy settings like you would with any cloud creative tool.
How long does a first storybook take?
Budget three to five hours of wall-clock time for a six-page book on your first run. That covers writing the story, training the character, one scene per page, and Canva assembly. Later books reuse the same character model and go a lot faster.
Can I add pets or siblings as characters?
Yes. Train a separate character model for anyone you want to recur, or add a one-off supporting character by inpainting them into a single scene without training at all. Keep the main hero on the trained LoRA so they stay consistent.
Does TheFluxTrain cost money for storybook pages?
Cartoonization, LoRA training, and scene generation all use credits on a paid TheFluxTrain account. ChatGPT and Canva have their own free or paid tiers. Budget credits for a few scene passes, since you rarely nail every page on the first try.
Once you've made one, the second book is easy. Reuse the same character model for a holiday edition, teach a lesson through a custom plot, or animate the scenes with voiceover once that lands on TheFluxTrain's roadmap.
If you get stuck on a scene, or a face that won't hold, that's normal on the first few pages. Keep the questions coming.
Cheers!