
Tutorials
Turn a flat map into a pin-drop video that ends on your building | TheFluxTrain

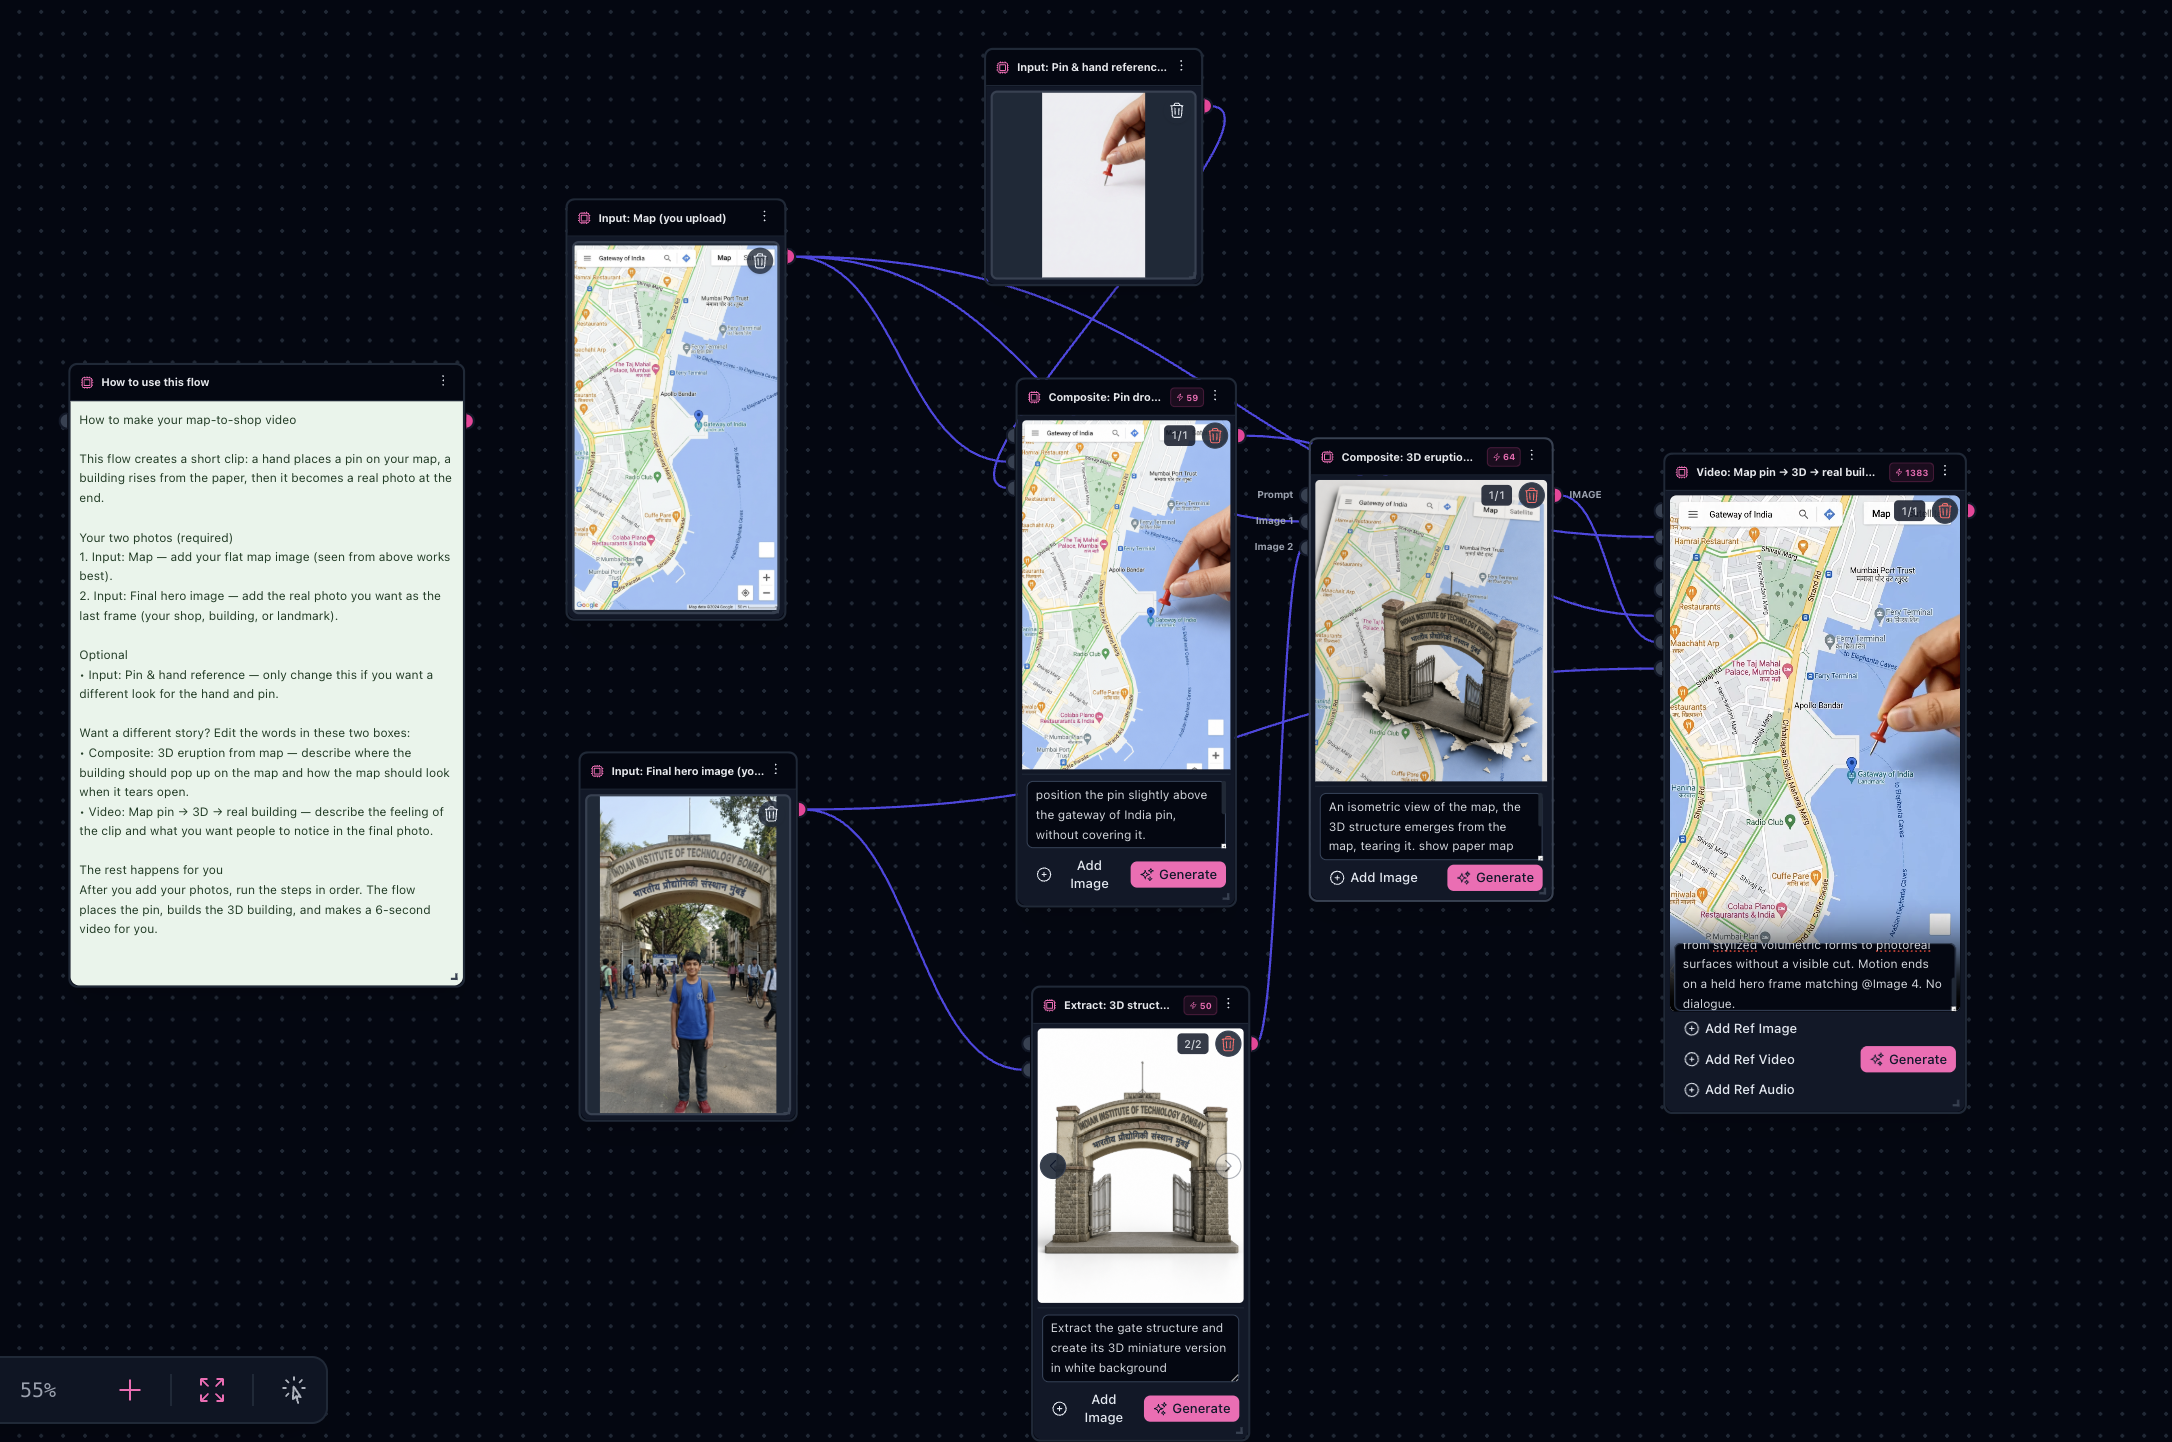
Map to shop transition makes a six-second clip for your phone: someone places a pin on a flat map, a little building pops up through the paper, then the video ends on a real photo of that place.
The sample uses a boy at the Gateway of India, so you get a tiny 3D version of the famous gate. You can use any ending photo instead—your house, café, hotel, or a landmark from a trip—and the same steps build a small 3D version of that building.
Tip: Your first custom version may take ten to twenty minutes while you try a few pictures and tweak the written instructions in a couple of boxes.
Try it: Map to location in Explore — opens ready for you in the editor.
What the finished clip looks like
Finished clip (tall phone shape) — pin on map, building rises, then the real Gateway of India photo
How the pictures build up (sample run)


What to gather before you start
- A flat map — a screenshot or picture of a map, best viewed from above. Tall phone proportions work well for Instagram or TikTok.
- A clear photo of the real place — this is the last moment of the video (shop front, house, monument, resort, and so on). The building should be easy to see.
- (Optional) A picture of how you want the hand and pin to look.
What happens, in plain words
You add your map and your ending photo. The template places a pin, makes a small 3D building from your photo, shows it breaking through the map, then turns it all into a short video that lands on your real picture.
Work through the picture steps from left to right on the screen, then make the video last.
Easy steps for your first run
- Open the template — Tap Map to location in Explore. It opens in Flow Studio, ready to go.
- Add your map — In the box named Input: Map (you upload), put in your map image.
- Add your ending photo — In Input: Final hero image (you upload), add the real photo you want at the end. This is not the map.
- Create the in-between pictures — Press Run on Composite: Pin drop on map, then Extract: 3D structure miniature, then Composite: 3D eruption from map (edit prompt). Glance at each result before moving on.
- Make the video — Press Run on Video: Map pin → 3D → real building (edit prompt). Your pictures are already linked—you usually do not need to upload them again here.
How to use your own place
The sample words mention the India Gate because the demo map and photos are from Mumbai. When you use your map and your photo, change both the uploads and the text in the boxes below so everything describes the same spot.
| What you want | Pictures to add | Boxes to update (in this order) |
|---|---|---|
| Your home | Neighborhood map + photo of the house | Ending photo, then Extract, Pin drop, 3D eruption, and the Video story lines |
| Your shop or café | Street map + photo of the storefront | Same—say “shop” or “café” in the text boxes and put the pin on your block on the map |
| A trip or landmark | Tourist map + holiday photo | Name the landmark in Extract and 3D eruption; in Video, say what feeling you want at the end (wonder, arrival, and so on) |
Ending photo — Input: Final hero image (you upload)
This photo matters most. The template takes the building from this picture and uses it for the small 3D model and the last frame of the video.
- Pick a bright, sharp photo where the building is large and clear.
- Very wide, distorted angles can confuse the result.
Tiny building — Extract: 3D structure miniature
After you change the ending photo, run this box again and change the words inside so they describe your building:
Sample (gate):
Extract the gate structure and create its 3D miniature version in white background
Your home:
Extract the house and create its 3D miniature version on a white background
Your shop:
Extract the café storefront and create its 3D miniature version on a white background
A trip:
Extract the Eiffel Tower and create its 3D miniature version on a white background
Pin on the map — Composite: Pin drop on map
Write where on the map the pin should go. Use words that match something you can see on the map—a street corner, a printed pin, or a label.
Sample:
position the pin slightly above the gateway of India pin, without covering it.
Add only the hand and the pin. Add realistic shadows on the map
Shop example:
Place the pin on the map where Main Street meets Oak Avenue, just above the printed label for our block.
Add only the hand and the pin. Add realistic shadows on the map
Building rises from the map — Composite: 3D eruption from map (edit prompt)
Describe where the map tears and what building grows out. The small 3D model from the previous step is used automatically—you mainly guide where and how dramatic it looks.
Sample:
An isometric view of the map, the 3D structure emerges from the map, tearing it. show paper map teared around the 3D structure.
3D structure is positioned at the Indian gate pin, covering it
Home:
Top-down view of the map. A small 3D model of the family house pushes up through the paper at the pin, tearing the map in a rough circle around the roof.
The house sits exactly on the pin location.
Trip:
The map tears open at the beach resort pin. A 3D miniature of the resort towers upward, with torn paper edges curling around the base.
Run this again after the tiny building picture looks right.
The video — Video: Map pin → 3D → real building (edit prompt)
You usually do not need to reconnect anything. The video box already uses four pictures:
| Name in the text | Which picture it is |
|---|---|
| @Image 1 | Your map |
| @Image 2 | Hand and pin on the map |
| @Image 3 | Building rising from the map |
| @Image 4 | Your ending photo |
How to change the video story without breaking it
The clip is split into four short moments (about six seconds total). The labels @Image 1 through @Image 4 tell the tool which photo to match in each moment—keep those numbers as they are.
Safe to edit in your own words:
- The first line — a short title for your story, for example:
Pin on our street map, house grows, becomes our real home photo. - The CONTINUITY section — what should stay the same throughout (same pin spot, same building shape, one hand only). Example for a shop:
The small shop in @Image 3 and the real storefront in @Image 4 share the same sign and door. - The last part (SHOT 4) — what people should notice in the ending photo. Example:
End on a welcoming view of the café door in @Image 4. - WHAT TO AVOID — usually leave this alone unless you see a specific glitch (two hands, odd fades, and so on).
Best left alone unless you are comfortable editing advanced timing: the @Image numbers, the second marks (0:00, 0:02, and so on), and the “match on action” lines between moments. Those keep the clip smooth.
Hotel trip example — change CONTINUITY to:
Pin lands on the same harbor marker on the map in every shot. The 3D hotel in @Image 3 and the real waterfront hotel in @Image 4 share the same silhouette and roof color. Only one hand at a time.
And add to the last moment (SHOT 4):
Hold on the sunlit terrace and logo visible in @Image 4 — this is the hero vacation reveal.
Then run only the video box again.
Quick checklist before the video
- Map and ending photo are yours, not the Mumbai demo.
- Extract text names your building (house, shop, landmark).
- Pin drop and 3D eruption both point to the same spot on the map.
- 3D eruption preview looks good before you make the video.
- Video text still uses @Image 1 through @Image 4 the same way as the table above.
Good to know
- Your map and ending photo should be about the same place. A pin in Paris with a pub photo from London will look wrong.
- Dark or blurry ending photos give a weak small building—try a brighter or cropped photo first.
- Six seconds is great for social posts. For a longer ad, finish in your usual video app.
Ready to try?
Open Map to location in Explore, add your map and ending photo, adjust the words in the boxes above, then run the video step for a pin-drop reveal of your place.